Managing speakers in a transcript
Rename speakers, reassign segments, and rerun speaker detection.
When Klang transcribes a recording it automatically detects and labels each speaker. The default labels are generic (“Speaker 1”, “Speaker 2”), so you will usually want to rename them to the actual names. You can also reassign individual segments to a different speaker, add new speakers, or rerun speaker identification with different settings.
How speakers appear in a transcript
Open a transcription from your analysis. At the top of the transcript you will see colored chips for each detected speaker. Below that, each segment shows the speaker name, a timestamp, and the transcribed text.
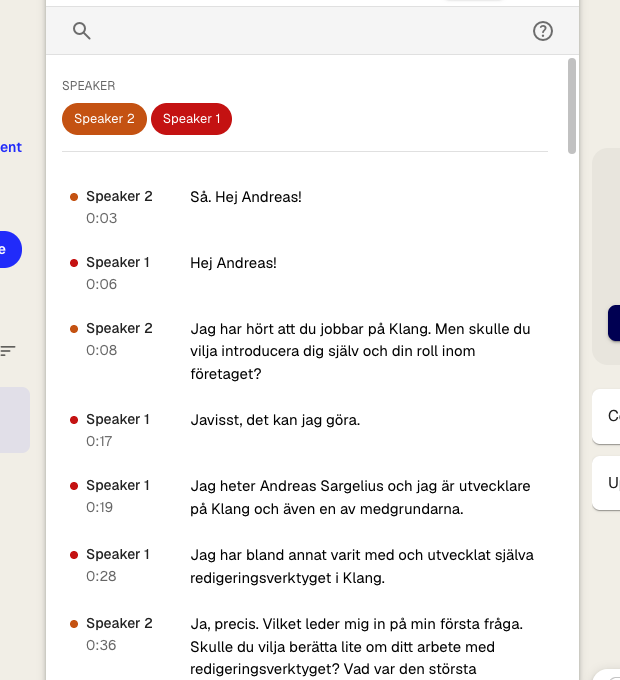
The colored chips act as quick filters. Click a chip to scroll to that speaker’s first segment.
Rename a speaker
- In the transcript, click the speaker name next to any segment. The speaker menu opens.
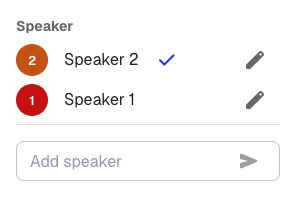
- Click the edit icon (pencil) next to the speaker you want to rename
- Type the new name in the text field
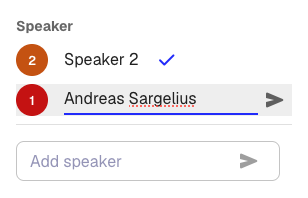
- Click the send icon to confirm
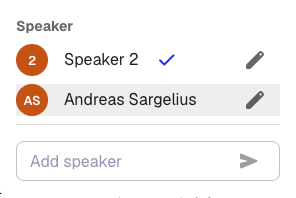
The new name replaces the old one in every segment throughout the transcript.
Reassign a segment to a different speaker
Sometimes Klang assigns a segment to the wrong speaker. To fix this:
- Click the speaker name on the segment you want to change
- In the speaker menu, click the name of the correct speaker
The segment updates immediately. A checkmark shows which speaker is currently assigned to the selected segment.
Add a new speaker
If the transcript is missing a speaker, for example when a new person joins partway through a recording:
- Click any speaker name to open the speaker menu
- In the Add speaker field at the bottom, type the new speaker’s name
- Click the send icon
The new speaker is added and assigned to the selected segment.
Rerun speaker identification
If the automatic speaker detection made too many errors, you can rerun it with different settings instead of fixing each segment one by one.
- In the transcript toolbar, click the Settings icon (gear)

- Click Rerun speaker identification
- Choose the number of speakers, or leave it on Automatic
- Click Run
Klang reprocesses the audio and merges the new speaker assignments into your existing transcript. Any speaker names you renamed before the rerun are preserved where possible.
Note: Rerunning speaker identification replaces the current speaker assignments. If you have made many manual corrections, consider whether a rerun will save time compared to fixing the remaining errors by hand.
Why the same name shows up twice with (0) and (1)
Sometimes Klang shows the same name twice, with a suffix like (0) and (1). This happens when speaker identification picked up more voice profiles than there are actual people, and two of those profiles ended up with the same name.
What to do depends on whether it is really the same person or two different ones:
- Same person, split across two profiles: Rename both speakers to the same name without the suffix. Klang merges them into one.
- Two different people who happen to share a name: Rename each to the correct full name (for example, one to Anna Lind and the other to Anna Berg) so each person has a unique label.
You can also reassign individual segments to the correct speaker using the steps above if only a handful of segments were misattributed.
Tips for better speaker identification
- Record video meetings with the Klang bot. When Klang joins a Google Meet, Microsoft Teams, or Zoom call, it picks up participant names directly from the meeting. This gives you real speaker names from the start and higher identification accuracy than audio-only uploads.
- Set the number of speakers when uploading if you know how many people are in the recording. This helps the detection algorithm.
- Recordings with clear audio separation between speakers produce better results. External microphones or separate audio channels improve accuracy compared to a single laptop microphone.
Was this article helpful?
Your feedback helps us improve our documentation.
Suggested Articles
Adding sources to an analysis
Attach transcripts, files, recordings, web pages, and pasted text to an analysis.
Analyzing multiple files in one analysis
Combine several transcripts, documents, or recordings in the same analysis.
Creating an analysis
Combine sources and use AI to extract insights, summaries, and answers.

Need more help?
Our support team is here to help you.