
Connecting Okta
Sync your directory and choose who can access each workspace.
Available on the Pro and Team plans.
Connect your Okta directory to sync members into Klang. Choose all synced users or limit access to specific groups.
Klang can sync from Microsoft Entra, Google Workspace or another SCIM service instead. Each workspace uses one provider at a time. An Okta connection can be shared by several workspaces.
Before you start
You need two things:
- In Klang: an admin on a Pro or Enterprise workspace
- In Okta: permission to add an application and configure provisioning
Groups are optional. Plan groups if you want different people to have different access or roles.
Get your credentials from Klang
- In Klang, open Settings → Workspace → Members → Member sync
- On the SCIM directory card, click Connect
- In the dialog that opens, choose the Okta tab
- Click Save to create the connection and show the URL and token
Klang shows a base URL and a token, along with the steps to follow in Okta.
The token is shown once. Copy it before you close the dialog. If you lose it, click Create new token to make a new one, but note that the old one stops working immediately.
If Connection settings is shown, keep Create a new connection selected for a new setup. To reuse a connection, select a workspace you administer instead and click Save. No new token or provider setup is needed.
To review setup later, open More options (⋮) on the connection card and select Show setup. The URL and provider instructions remain available, but the saved token cannot be shown again. Close closes the guide without changing the connection.
Add the application in Okta
- In the Okta Admin Console, go to Applications
- Click Browse App Catalog
- Search for SCIM 2.0 Test App (OAuth Bearer Token) and click Add integration
- Name it
Klang, then click Next and Done
Despite the name, this is Okta’s generic SCIM connector. It is how you connect an application that is not in the Okta Integration Network, and it is the same connector many vendors document.
Paste the credentials into Okta
- In the Klang application, open Provisioning
- In the left column choose Integration, then click Edit
- Tick Enable API integration
- Paste the Klang base URL into SCIM 2.0 Base Url
- Paste the Klang token into OAuth Bearer Token
- Click Test API Credentials. Okta should answer that the app “was verified successfully”
- Click Save
If the test fails, check that you copied the whole token and that the base URL has no trailing slash.
Turn on the actions Klang needs
This is the step people miss, and skipping it makes everything afterwards fail quietly.
- Still under Provisioning, choose To App in the left column, then click Edit
- Turn on Create Users, Update User Attributes and Deactivate Users
- Leave Sync Password off. Klang never signs anyone in with a password from Okta
- Click Save
Make the changes inside the Edit form. The same options are also shown read-only above it, and ticking those does nothing.
Without Create Users, Okta only looks for people who already exist in Klang and never creates anyone. Every assignment then fails with Automatic provisioning of user ... failed: Matching user not found.
Assign the people
- Open the Assignments tab
- Click Assign, then Assign to People or Assign to Groups
- Pick who should be provisioned, and click Save and Go Back, then Done
Assigning somebody creates them in Klang. It does not yet give them access to a workspace; that is the last step below.
Optional: Push your groups
You can skip group provisioning when using All synced users. To select specific groups in Klang, send those groups and their memberships.
Okta sends group names separately from people, so this step is what makes your groups appear in Klang.
If you assign the application through a group, use a separate group for Push Groups.
- Open the Push Groups tab
- Click Push Groups → Find groups by name
- Type the group name and pick it from the list
- Leave Push group memberships immediately ticked
- Okta says Match found if a group with that name is already in Klang, in which case choose Link Group. Otherwise it offers Create Group
- Click Save
Choose members for this workspace
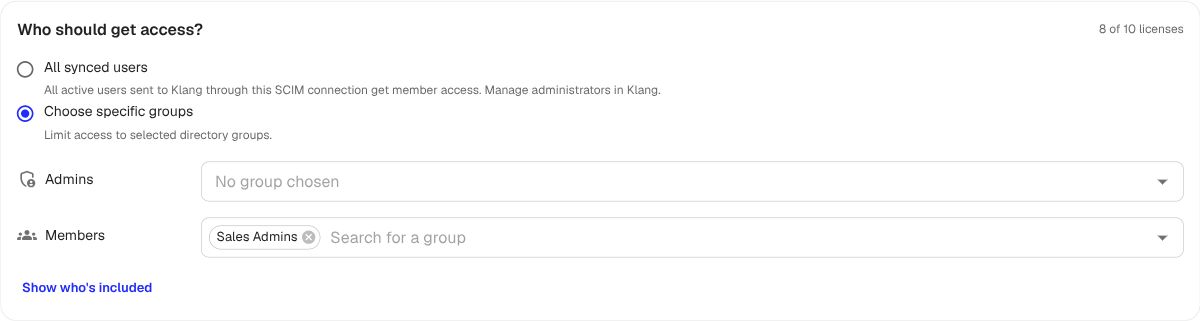
All synced users gives member access to every active user sent through this connection. Manage administrators in Klang. Your provider still determines which users are sent.
- Back in Member sync, find Who should get access?
- Choose All synced users or Choose specific groups. For specific groups, select which groups give Admin or Member access
- Click Show who’s included to review the people in your selection
- Review any additional seats, then click Save
Groups can overlap; each person is counted once per workspace. Nobody gets access from a new connection until you save a selection.
Use the connection in another workspace
- Switch to another workspace you administer
- Open Settings → Workspace → Members → Member sync
- On the SCIM directory card, click Connect
- Select the workspace whose connection you want to reuse
- Click Save to use this connection
- Choose who should get access and save the selection
You need to administer both workspaces when linking them. The connection is shared, so Okta only needs to be configured once. The same group can grant different roles in different workspaces.
What happens from now on
- Active users included in your saved selection get access to this workspace
- Users who are deactivated or no longer included in your selection lose synced access. Their content stays
- Someone unassigned from the application, or deactivated in Okta, loses access the same way
- Admin groups can promote members. Existing admins retain their role when they move to a member group
- People who have never signed in to Klang get an invitation by email
You keep managing people in Okta. Klang follows.
Rotating the token
On the connection card, open More options (⋮) and select Create new token. Any admin of a linked workspace can do this. The confirmation names all affected workspaces: the old token stops working for all of them. Paste the new token into Okta’s OAuth Bearer Token field to resume sync.
If something does not sync
- Test API Credentials under Provisioning → Integration re-checks the connection at any time
- Okta shows per-user errors on the Assignments tab. Click the red icon next to a person to read the reason
Matching user not foundmeans Create Users is off. See the step above- The Import tab reads your groups back from Klang, but not your people. Klang answers a request for its full user list with an empty result on purpose, because it is not a source of truth for your directory. Push is the direction to use
Disconnecting
Click More options (⋮) → Disconnect to stop syncing this workspace. Existing members keep their access and become manually managed; pending sync invitations are canceled. Other linked workspaces continue syncing. Disconnecting the last workspace also removes the shared connection and its token.
Was this article helpful?
Your feedback helps us improve our documentation.
Suggested Articles

Need more help?
Our support team is here to help you.